Hanging out at Ceder Camp, listening to NPR on the radio.... Clair never goes anywhere without her Pookie bear.
Friday, August 5, 2011
Tuesday, July 19, 2011
Unfinished Object now Finished
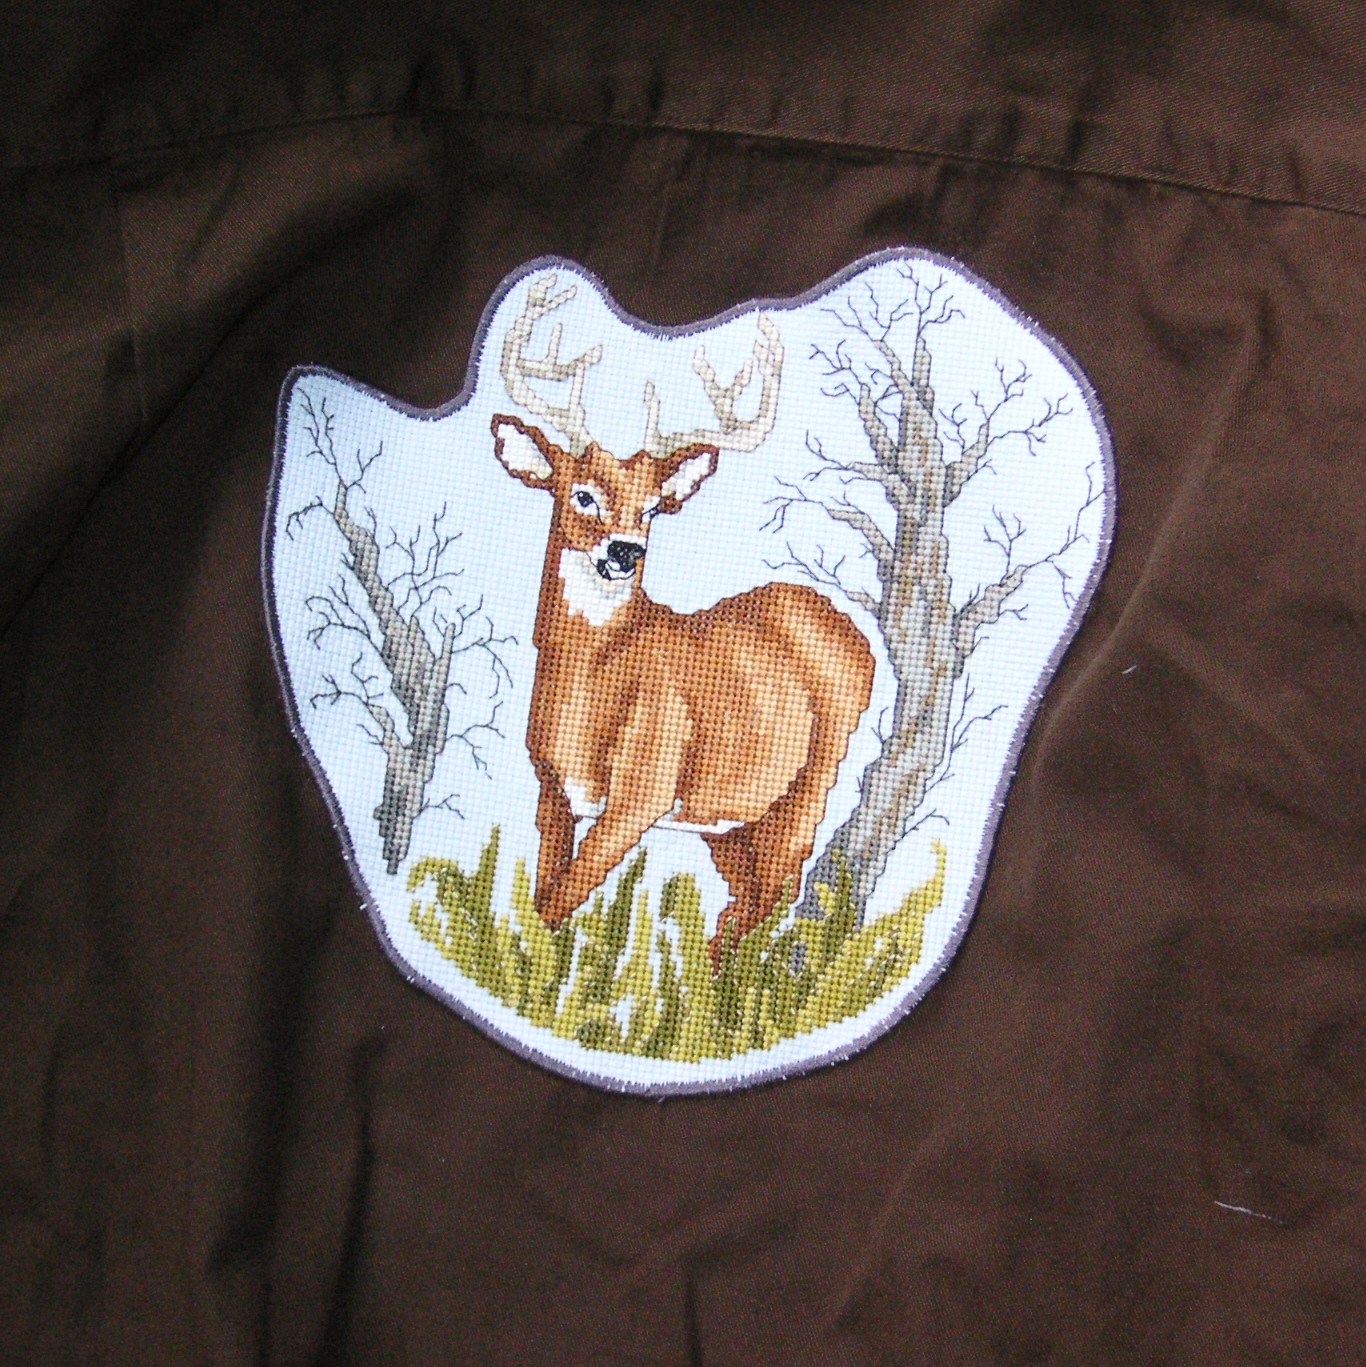 This was a good day for getting to an unfinished project. My mom stitched the animals years ago. She used to stitch directly onto shirts for my brothers, but she's not here anymore.. so this is what I did so that they would have new shirts with "old stitching".

 I ironed "heat N bond light" to the back of each stitched piece; then cut them to the desired shape. Basically, this means simply cutting around the design, leaving about 1/2 inch all around.
 Note: Use "light" rather than heavy duty Heat N Bond.... the heavy duty will gum up onto the needle later when you stitch the design in place. Very annoying!
After the piece has cooled peel the paper backing off. Position the piece right side up on the center back of the shirt. I folded the shirt and gave it a slight crease to insure that the design would be placed in the center, and straight.
Then, iron again. I ironed from the front, then turned the shirt over and ironed from the back to insure a good bond.
Note: Ironing from the back of the shirt raises the stitching slightly giving it a bit of dimension.
 Once the shirt with bonded on stitching has cooled you can move to the sewing machine. Set the machine for a 3.5 mm zigzag stitch with a buttonhole stitch length. On my machine, that's about #1. I put a buttonhole presser foot on the machine, mostly so that I would have a good visual of where I was stitching. Also you will want a size 12 or 14 needle in your machine.
Begin stitching at the bottom... keep stitching around the edge till you come back to where you began. Then, stitch over it a second round for better coverage. Trim threads, and Done!!
Voila!!
 I used new shirts that my brother brought to me, and he selected which animal print for each shirt.... come to think of it... I have 4 brothers, and only 3 completed shirts! Did I agree to get the 4th shirt? Guess I'm not finished with this project after all!
 I used new shirts that my brother brought to me, and he selected which animal print for each shirt.... come to think of it... I have 4 brothers, and only 3 completed shirts! Did I agree to get the 4th shirt? Guess I'm not finished with this project after all!
The shirt with iron-on can be washed and dried by machine. Because it is stitched, it will not come off, in the way that it might if you simply ironed the design onto the shirt without the zigzag stitching. The stitching will probably outlast the life of the shirt. This could be a good thing!
When ironing the shirt (if you must), be sure to iron the stitched area from the back as your final step. Just turn the shirt over on the ironing board and give it a good steam/press.
Monday, May 30, 2011
 Dipping into my stash of vintage hankies, I found this wonderful blue with red rose border. It cried out to be used as the skirt portion on a sundress, so here it is! The bodice is cotton with beading at the neck edge; neck trim wraps to the back as straps. The sundress has a snap back closure. The skirt has a white underskirt with heirloom quality lace at the hem; the skirt wraps in front... matching scarf is super long and beaded at both ends. Great as a scarf, wrap, belt or headband!
Monday, May 16, 2011
 Newest Sundress... I made several of these; expect to see more at my table at BlytheCon 2011 in Portland. The artist "manni" is added here to show the backless back with snap closure. Huge red star button accents the front. The bodice is made from a wonderful cotton with textured stripes. I don't think you can see them in the photo, but the stripe is bordered by a metallic thread for a bit of sparkle. Subtle!
I make my bias trim for the neckline /straps from quilting cotton. Easy peasey! Cut strips 1.25" wide on the bias; iron to crease in half lengthwise, then open, crease again on each 1/2 of the strip; finally, close the strip and iron one more time!
Have I said before that the iron is the most useful tool in the sewing room other than the sewing machines of course! ??
Friday, May 13, 2011

 A day at the beach; Pt St George... perfect weather and Lola (dog) is wet and sandy. She will need a dip in the river on the way home. Actually... she got a bath, so she smells good too!
New sundress uses Milktooth fabric for the bodice; Seasick Sailor... in blue and cream. The sundress is my current favorite to make; it looks so cute with a wrap!
I made up several of this sundress; one has already been purchased and shipped with a blue wrap. I may have a few at BlytheCon 2011 in Portland... see you there!
Monday, May 9, 2011

 Tshirt dressing for Momoko; this dress was actually made for Blythe, but fits Momoko to a "T". The nautical fabric has tiny ships wheels in an all-over print. The scarf is red plaid chiffon.
Dress has back snap closure, bataux neck, and raglan sleeves. The sleeves are 3/4 length on Momoko, full length on Blythe.
Saturday, May 7, 2011
 It's a wrap! I'm having so much fun with knitting these little dolly wraps! They're perfect for wearing with sundresses, and great as a hair band too! The yellow sundress has already gone to a customer, but I will be making more.
 The bandana print sundress is one of my favorites at this moment.
 Who knew that the Blythe doll and the artist doll would be the same size? Blythe dresses fit them perfectly, so I am using them to model, although Clair is a bit nervous about their tiny heads.
 More wraps in the colors of summer.. this yarn shades from reds to blues.
Subscribe to:
Posts (Atom)