Search This Blog

Monday, October 19, 2015


A bit different than a raglan, this circular yoke is more akin to Fair Isle or Norwegian patterned winter sweaters. Knit from the top down with two rounds of increases (K2, M1 across, ending with K2) several rows apart in the yoke for this size (Blythe, Pure Neemo S). The sleeves are picked up onto stitch holders while the body is finished below the bust. Then the sleeves are picked up on 3 dp needles and knit in the round down to the sleeve hem. For larger dolls, you may need an additional round of increases. I make 3 YO, K2tog buttonholes for back closure on rows 3, 7, an 11. 


I love the detail of hand smocking and included it on this dress; a dainty crochet collar finishes it off. the The dress can be seen in my etsy store.

Thursday, October 15, 2015

New OOAK dolls from Ppinkydolls. Both Miko, but Miko with the pink wig is slightly shorter as the leg piece from the knee to ankle is shorter. Perhaps a Pure Neemo S, while the other is a Pure Neemo M?  The artist used a newer version of neck ball joint for Miko with the blue hair, so she has a wider range of motion (and supposedly is safer for the doll?)... she can drop her chin practically down to her chest and can look higher up to the sky.Even without the longer legs, Miko blue would be a tad taller just because her head sits higher on her neck.  
 

Monday, October 12, 2015


What's on your plate this morning? I'm having hard boiled eggs with dots of Pepper Plant, diced tomato, with a bit of chives sprinkled on top..

The perfect hard-boiled egg is made as follows:

Put 2 -4 eggs in a small pan; cover with water.  Bring to a boil. Set timer to 1 minute. When the timer goes off, turn off the heat under the pan. Cover with lid. Set timer to 16 minutes.   Perfect eggs every time..... Put pan under cold water; peel eggs quickly for warm eggs....


Saturday, October 10, 2015

Blue and White Smocked Dress, shown on Pure Neemo S doll

The making of the perfect dress for Blythe, Pure Neemo S..... note the little crocheted lace bit at the neckline.... Love that detail!!!
:)

I found this wonderful vintage blue/white striped fabric... it's been sitting around in my sewing room awhile waiting for the perfect project. This is it!


I got out my vintage Pleating machine, and tested pleating on a scrap...
:
Then found my old English Smocking Instructions that I used way back in the 1980's for teaching Smocking classes:

And, because I love doll dresses with hand knit tops, I tracked down a pattern for a circular yoke, which I will not show here because I modified it so drastically!! But the top was knit from the top down, with sleeves being put on stitch holders, then later picked up and knit in the round... Perfect for how I like to knit!
Pleats gathered, and surface embroidery completed.... this will be the skirt for the dress.


The bodice is knitted flat, the sleeves knitted in the round... I added yo,K2tog buttonholes in the back... Did I mention that I hate, hate, hate sewing on snaps, and detest velcro?? I will use both when absolutely necessary.... but it isn't necessary here!


Oh, what the hay! This is the pattern that I started with.... and can be found on etsy. 


The doll body is Pure Neemo S..... which means that the dress will fit my new Ppinkydoll, Miko.... also, Blythe.

Taaa-Daaa! 


Friday, October 9, 2015

Blythe, Soom imda 2.2, RealPuki Dresses


Still sewing for Blythe, but sewing for ball jointed dolls is more challenging for me in that they come in all shapes and sizes, just like us! This means that while dresses may appear to be "alike", often there are adjustments to the sizing and the stitches in order to get the perfect fit for each doll. In the case of these dresses, however, Blythe and Soom imda 2.2 can wear the same size. Blythe is shown wearing a matching Wrap on her head. I designed this as a shawl/headwrap. When worn on the shoulders it hugs the body due to the short row shaping.

Sewing the dress for realpuki meant that a hat must be added. Most realpukis dislike wigs, but love their hats!

Handknit bodice with button closure in the back. Skirt is attached to the bodice. I love the double ruffle with the "scooped" gather in front! The underskirt is made with subtle print chiffon and is trimmed with antique lace dating to approximately 1900. These can be seen in more detail in my etsy shop:
www.ssmartraggs.etsy.com


Wednesday, February 26, 2014

 Knitting for tiny ball jointed dolls is like eating popcorn! These little dresses, rompers and hats each takes less than 25 yards of sock weight yarn and about 45 minutes to knit.  My Romper pattern is an adaptation of a Strawberry Shortcake romper designed by Polly... RealPuki would swim in a SSC outfit!! The dress is a further adaptation. The hat is my own design.
Polly's pattern can be found on Ravelry, or on her website.

 RealPuki Soso from Fairyland.... a day at the beach.. she quickly got rid of her dress, but kept on her hat rather than risk sunburn on her bald head!
Happy Spring! Dress and Romper pinwheel!
 I have already listed some of these in my etsy shop... love the surprise of orange that shows up in this ball of yarn!

Thursday, January 9, 2014

PukiPuki.... Cupid
This tiny bjd reminds me of my sister; you knew she was in a high level of concentration because her tongue was sticking out!

Saturday, January 4, 2014

New doll in the house.. she's SoSo tiny!! (BJD from Fairyland.)

I found a romper pattern on Ravelry by Polly that nearly works for her. Thank you Polly! Several trials and changes later I am Lovin' it!!
The primary change was to knit circular rather than flat; I hate seaming in knitting, and I disliked the bulk created by the seams in this tiny garment. Also, I want to use the pattern for a bit of fair isle, which is easier for me knitting in the round.

I use the loop over the thumb method of adding stitches rather than the "Knit in the front and back (Kfb) because I think it causes less distortion of the knitting.

The original pattern uses sock yarn and (US size 0) 2.00 mm needles; the first try was too stiff for my liking, so I went to larger (US size 1) for the body. I'm working with Ty-DY Socks, by Knit One, Crochet too. It is 436 yards/100 grams. It has a softer feel and finer hand than most of the other sock yarns I started with. Reminder to self: Go to LYS to get another ball in another color range!

Note: I had posted my changes to Polly's pattern, but looking back at it made it confusing, even to me! So I have removed the changes and will later post my complete version of the romper pattern, rather than just the changes.


You can find Polly's pattern for sale on Ravelry.  Happy Knitting!

Monday, January 7, 2013


My dear friend Cricket from the great state of Georgia sent me the link to this interesting crocheted scarf by fiberflux (see her blog).... She calls it the "Pavement Infinity Scarf".

I haven't picked up a crochet hook in years but this looked interesting, so I gave it a go. The design is intended for a bulky weight Thick and Thin by Lion Brand and a size 9mm/N hook.
Having neither on hand, I opted to test the pattern using a worsted weight ragg wool and a size 7mm/K hook.
Once the Foundation Row is set up the pattern is a simple repeat of Row 1 for 60 inches or until your yarn holds out, or until you decide to quit! Leave enough of a tail to whip stitch the two ends together... this is the step that makes it the circular Infinity scarf. 
The pattern is intended to have a smooth edge at the sides, which is accomplished by the dc in the last space (ch 3 turning space). If you like the scalloped edge simply ignore that bit, and after the last V in the row, chain 3, turn (or turn, chain 3 if you prefer) and begin the next row. The scallops lay flat without curling and gives the scarf a nice finished edge.

Thursday, March 22, 2012

Knitting for little dolls may be tedious, but I love the instant (almost) gratification! I saw this yarn in a semi-local big box store and liked the colors... I was surprised as I grew up wearing knitted garments my mom made from the local dime store variety of yarn and swore never to use it myself!! Tacky acrylics; bleh! This yarn is 70% superwash wool/30% nylon, which should wear well if made up into a pair of socks!

Seeing this sock yarn made me pick up a skein to see how it worked up. A bit thicker than most sock yarns that I use, and a bit coarser. But I DO love the color shading! The sweater is an all-over mock cable with stockinette sleeves, reverse stockinette yoke, and 2x2 rib collar. The design is technically a work in progress, as it is slightly smaller than I wanted it to be... sigh.....
But the doll is happy in the coat of many colors!

Saturday, March 17, 2012

Susie #6 models the one of a kind Butterfly Dress made for Blythe. The bodice is made from a vintage handkerchief; I used the embroidered corner as an overlay. The dress has since been shipped to it's new dolly!
Note: not all Blythe clothing will fit Susie. She is thicker in the waist, and shorter in the body.

Susie #5 can't keep her hands off Susie #6's hair... I don't blame her; the mohair is incredibly soft to the touch.
Meet Apple Annie
Susie #6 gets new hairs because she arrived with such matted fried hair that it refused to clean up... besides, I was anxious to do a reroot on a Susie! I used a natural undyed mohair in a smoky brown color. It shades from light to darker at the tips. She wears an apple appliqued dress with striped tights. Annie is available on my etsy site: ssmartraggs.etsy.com

Saturday, February 25, 2012

The Susie Sad Eyes doll currently living here: The two new girls have had a spa day, and are waiting to dry. The black haired Susie holding her head up high did not respond well to the best hair treatment, so I have nothing to lose... 1st Susie reroot!!

Work in Progress - Susie Sad Eyes getting a new "do.


This little Susie Sad Eyes arrived with black hair that was so matted and frizzed from years of being played with that the only thing to do was give her new hair! I still had some of the natural smoky brown mohair seft over from rerooting my Blythe doll, and it looked to be enough for this girl. Her appearance is much changed from the waif before!

Wednesday, August 31, 2011

Susie Sad Eyes

Susie Sad Eyes is new to our house. Vintage 1972, this little darlin' has had her toes chewed by some pet (or maybe a child) in her former life. Must have been well loved! Think her name will be Nibbles.Standing at 8", she is thicker of body than Blythe, and a bit shorter in the torso, but some of my Blythe items will fit her well. That's good; means a bit of tweaking of patterns here and there, but will be relatively easy to outfit the Susie Sad Eyes dolls for listing in ssmartraggs.etsy.com.


Wednesday, August 24, 2011

Argyle Sweater for Kelly doll

Just a little something I knit up for Kelly doll on 4/0 needles and lace weight misty alpaca. Traditional argyle would have separate balls of yarn for the blocks, which I did; but I stranded the background blue and then backstitched the XXXs across the blocks.. not authentic, but easier to do!

Monday, August 15, 2011

Knitting for adults is such a treat for a change! I came across this super simple design in Ravelry by Martina Behm for a little scarflette that called out to be knitted up for fall wearing. The scalloped edge was a bit tricky at first, but after watching the video (link is in the pattern) and completing one or two scallops it was a piece of cake!

So, on a road trip I knitted up the solid teal 22.5 Degree wrap using 3 balls of vintage yarn from my stash... it's a bit heavier, being a sport weight, but a yummy texture using size 9 circular needles. 50% Kid Mohair/ 50% Wool blend.
The wrap is knitted from the top down; the last two rows are the knitted shell and bind off.


The designer calls it "22.5" Degrees as it is just that! Not the normal 45 Degree scarf, or shawl, which hangs long in the back, but, rather, it is intended to sit on the shoulders, wrap around the neck and be tied or draped. Perfect to add just a bit of warmth.

If you follow the pattern using sock yarn, you will end up with a width of 165 cm (65 inches), and a depth of 35 cm (14 inches). My first effort is using Ty-Dy sock yarn, which patterns beautifully and has a wonderful soft drape knitted up on US size 3 circular needles. I used up the ball and now the project is sitting aside as a WIP until I get to the local yarn shop for another ball.

Friday, August 5, 2011

Hanging out at Ceder Camp, listening to NPR on the radio.... Clair never goes anywhere without her Pookie bear.

Tuesday, July 19, 2011

Unfinished Object now Finished

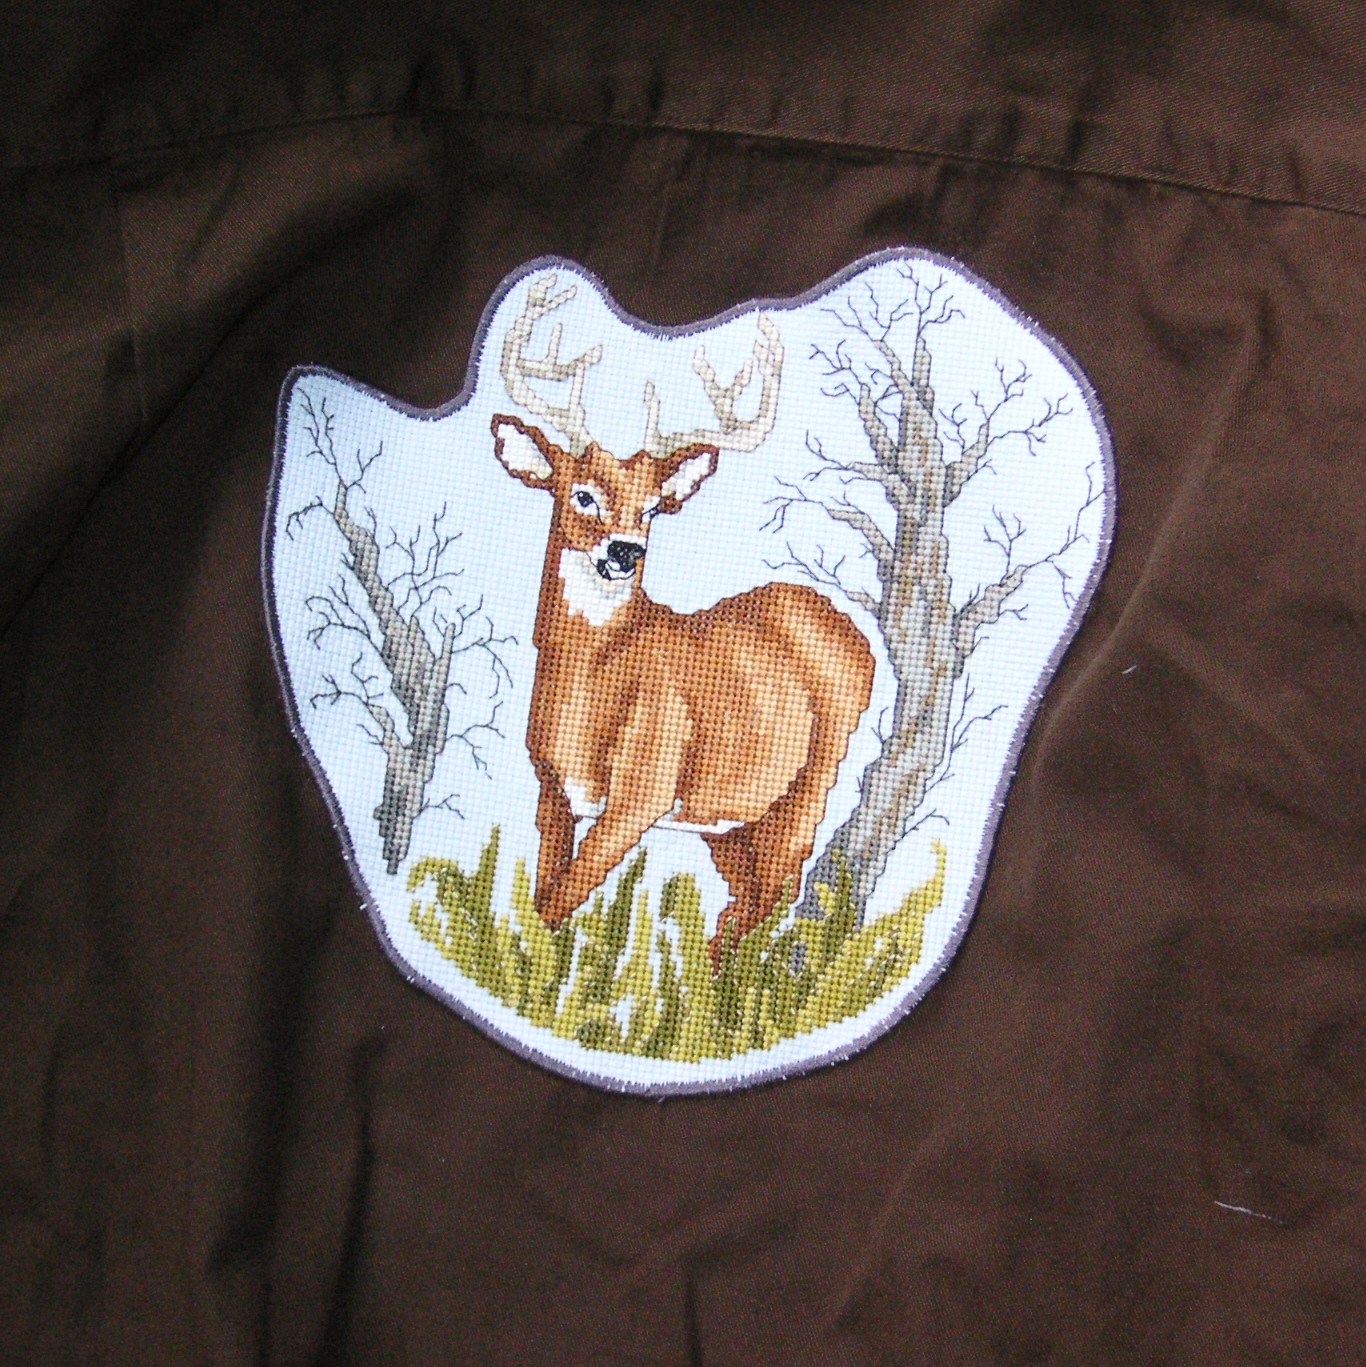
This was a good day for getting to an unfinished project. My mom stitched the animals years ago. She used to stitch directly onto shirts for my brothers, but she's not here anymore.. so this is what I did so that they would have new shirts with "old stitching".


I ironed "heat N bond light" to the back of each stitched piece; then cut them to the desired shape. Basically, this means simply cutting around the design, leaving about 1/2 inch all around.

Note: Use "light" rather than heavy duty Heat N Bond.... the heavy duty will gum up onto the needle later when you stitch the design in place. Very annoying!

After the piece has cooled peel the paper backing off. Position the piece right side up on the center back of the shirt. I folded the shirt and gave it a slight crease to insure that the design would be placed in the center, and straight.
Then, iron again. I ironed from the front, then turned the shirt over and ironed from the back to insure a good bond.
Note: Ironing from the back of the shirt raises the stitching slightly giving it a bit of dimension.
Once the shirt with bonded on stitching has cooled you can move to the sewing machine. Set the machine for a 3.5 mm zigzag stitch with a buttonhole stitch length. On my machine, that's about #1. I put a buttonhole presser foot on the machine, mostly so that I would have a good visual of where I was stitching. Also you will want a size 12 or 14 needle in your machine.

Begin stitching at the bottom... keep stitching around the edge till you come back to where you began. Then, stitch over it a second round for better coverage. Trim threads, and Done!!
Voila!!
I used new shirts that my brother brought to me, and he selected which animal print for each shirt.... come to think of it... I have 4 brothers, and only 3 completed shirts! Did I agree to get the 4th shirt? Guess I'm not finished with this project after all!

The shirt with iron-on can be washed and dried by machine. Because it is stitched, it will not come off, in the way that it might if you simply ironed the design onto the shirt without the zigzag stitching. The stitching will probably outlast the life of the shirt. This could be a good thing!
When ironing the shirt (if you must), be sure to iron the stitched area from the back as your final step. Just turn the shirt over on the ironing board and give it a good steam/press.


Monday, May 30, 2011

Dipping into my stash of vintage hankies, I found this wonderful blue with red rose border. It cried out to be used as the skirt portion on a sundress, so here it is! The bodice is cotton with beading at the neck edge; neck trim wraps to the back as straps. The sundress has a snap back closure. The skirt has a white underskirt with heirloom quality lace at the hem; the skirt wraps in front... matching scarf is super long and beaded at both ends. Great as a scarf, wrap, belt or headband!

Monday, May 16, 2011

Newest Sundress... I made several of these; expect to see more at my table at BlytheCon 2011 in Portland. The artist "manni" is added here to show the backless back with snap closure. Huge red star button accents the front. The bodice is made from a wonderful cotton with textured stripes. I don't think you can see them in the photo, but the stripe is bordered by a metallic thread for a bit of sparkle. Subtle!

I make my bias trim for the neckline /straps from quilting cotton. Easy peasey! Cut strips 1.25" wide on the bias; iron to crease in half lengthwise, then open, crease again on each 1/2 of the strip; finally, close the strip and iron one more time!
Have I said before that the iron is the most useful tool in the sewing room other than the sewing machines of course! ??

Friday, May 13, 2011


A day at the beach; Pt St George... perfect weather and Lola (dog) is wet and sandy. She will need a dip in the river on the way home. Actually... she got a bath, so she smells good too!

New sundress uses Milktooth fabric for the bodice; Seasick Sailor... in blue and cream. The sundress is my current favorite to make; it looks so cute with a wrap!
I made up several of this sundress; one has already been purchased and shipped with a blue wrap. I may have a few at BlytheCon 2011 in Portland... see you there!